INTRODUCTION
This post aims to describe how to deploy infopath forms as form templates in a sharepoint site using Powershell.
SCOPE
This post will not detail out how to create a custom infopath form. It will assume that there is already an existing Infopath source files that are for deployment.
REQUIREMENTS
Sharepoint 2010
Microsoft Infopath Designer 2010
IMPLEMENTATION
1.Locate the manifest.xml, right-click and click on Design. The Infopath Designer should load.
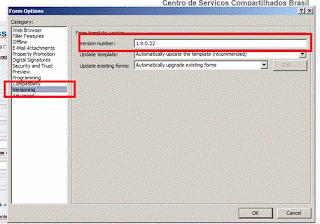
2.Whenever modifications have been made to the form, it is a good practice to change the version of the infopath form. This is because when you create a version 1.0 and so on for a form, all of the previous versions will be saved in Sharepoint. To do this, Click on File on the Infopath Form Designer. On the Info Ribbon tab, Click on Advanced Form Options.
The Form Option dialog box should appear.
3.Change the version on the Version field.
4.[Not Required] If you would like to create another set of source files for the modified Infopath form, you can do so by re-exporting the source files into another location.
Click File and select the Publish Ribbon. Click on the Export Source Files.
5.Select the folder where you want to save the Source Files. On the Folder field, type in the folder name where you want to save the files.
6.To publish your form into an Infopath .xsn format, Click on File and Click on the Info Ribbon Tab. On the Info Ribbon Tab, Click on the Quick Publish button.
7.Please take note on the location of the .xsn to be published. The directory is displayed on the right hand part of the Quick Publish section.
8.This operation will result in the creation of a .xsn file. A .xsn file defines the data structure, appearance, and behavior of Finished forms. This particular file is what is to be deployed in sharepoint.
9.Deploy Infopath form using Powershell. Click on Start>All Programs>Microsoft Sharepoint 2010 Products. Click on Sharepoint 2010 Management Shell.
10.To Uninstall the existing xsn Form Template. Type in the Management shell
Uninstall-SPInfoPathFormTemplate -Identity Exampleform.xsn
11.Install the new solution based on the .xsn file path. For example, the .xsn is located in drive c:/
Install-SPInfoPathFormTemplate -Path C:\Form.xsn
12.To disable the feature on the site collection level, type in the management shell. For example, the site collection URL is http://SPSite.
Disable-SPInfoPathFormTemplate -Identity "Form.xsn" -Site http://SPSite
13.To enable the feature on the site collection level, type in the management shell. For example, the site collection URL is http://SPSite.
Enable-SPInfoPathFormTemplate -Identity "Form.xsn" -Site "http://SPSite"
14.Verify that the form was indeed deployed on the Sharepoint site. Browse to your site, make sure that you have the necessary rights to view the Form Templates. Click on Site Actions > View All Site Contents and Click on Form Templates.
15.The Infopath form should be on the List of the Form Templates.


_1342.jpg)
2 comments:
nice post :D
Thanks!
Post a Comment