Tuesday, 12 November 2013
HOW TO ADD A CUSTOM VISUAL WEBPART PROPERTY IN SHAREPOINT 2010
I. INTRODUCTION
One of the requirements of my new webpart project is to allow the end user to customize some of its display parameters (E.g. warning messages, url links). We wanted to give our end-user the flexibility to change those data during runtime. Usually this is done by creating webpart properties.
II. REQUIREMENTS
- Sharepoint 2010
- Visual Studio 2010
III. IMPLEMENTATION
1. Create an empty sharepoint project in Visual Studio 2010. Add a Visual webpart to that sharepoint project. You will notice that Visual Studio creates several files to provision our new webpart.
2. Open the file named visualwebpart1.cs. You will notice that this class inherits from type Webpart. It has an override to the method CreateChildControls(). It also has a string path to the newly created UserControl. What it does is just to load that usercontrol to the webpart. That usercontrol has a type ‘Control’ by default.
3. So on our example; we have already established that we have two important objects here. One is the webpart class itself, and the other one is the user control. Remember, we are only loading the user control (which serves as our UI) to our webpart class.
Normally, the webpart property is done like the one below. We will add it on the visualwebpart1.cs file just after the CreateChildControls() method.
4. The next challenge here is that how are we going to relay this property so that our usercontrol will be able to read it. The solution is to create an instance of the webpart inside our usercontrol.
Open VisualWebPart1UserControl.cs and add the following code just before the page load method.
5. Back in our VisualWebPart1.cs, remember that it is adding up our usercontrol with the type ‘Control’. Since we have added an instance of webpart on our usercontrol, we need to cast it with our own type of usercontrol which is ‘VisualWebPart1UserControl’.
6. So we can now access that property on our user control. So for example on a label control, we can now do something like this.
Assuming that we add a label control on our user control, we can now assign it a value using our newly created property.
7. On your webpart toolbox, you can now see an available configuration for your property.
Wednesday, 4 September 2013
How to Display Item Count in Listview using SP Client Side Scripting
INTRODUCTION
We have a request from our client to display in the listview page the number of items on a Sharepoint list. They wanted us to do this via only the Content Editor Webpart and SP Client side scripting.
I will detail out on this post how to accomplish this task. Special thanks to our onshore counterpart who guided us on doing this.
SCOPE
This post would assume that there is already an existing custom list in place. I will not detail out how to create a site and custom list in sharepoint.
IMPLEMENTATION
1. Make sure that you have at least a designer permission before you proceed.
2. Navigate to your list http://< your site collection>/Lists/<List Name>/
3. On the Site Actions link, click on the ‘Edit Page’ link.
4. On the Main Content section, Click on the ‘Add a Web Part’ link. On the Categories section, click on the Media and Content and select Content Editor.
5. On the Editing Tools tab, click on the Edit HTML Source link.
6. On the HTML Source Edit box, create the controls that will be used. Create an html button and a span tag with an id “itemCount”.
7. Insert the script inside the span ‘ItemCount’ tag.
8. Press on OK, and on the Page ribbon, click on Stop Editing.
To test what we have done, click on the Show Item Total Count
Wednesday, 17 July 2013
[ERROR FIX]: Active Directory Account display name not automatically updated in Sharepoint 2010
PROBLEM
For my today’s task, I ran into an issue in sharepoint when my manager wanted me to modify the display name of one of our client account. Despite changing the display name information in the Active Directory, sharepoint was still showing the old display name in the ribbon toolbar and in the people picker when granting the user rights in the site.
Correct me if I am wrong, but I do think that there is no way to edit the information using the browser.
Because when you click on the user’s name, there you will see additional properties of the user. It delighted me because i thought that this is the fix seeing that there is an ‘Edit Item’ on top.
SOLUTION
Although some would suggest to do this via a Powershell script that would forcefully update the data, I have researched a way to do this via the browser.
Sharepoint maintains a User Information List that contains all the users that updated any item within the site or if the users have been granted access on the site. However this list is hidden and is located at http://<SiteCollectionUrl>/_catalogs/users/detail.aspx.
So if the display name was indeed modified on the Active Directory and if sharepoint can’t seem to update its display, then do the following steps:
1. Access the User Information List
2. Look for the User Account and click on the link
3. Delete the User on the User Information list.
4. Login the User Account.
On the next User login, the User information list is automatically updated with the new AD information.
Display name label seems to be sourcing its data into this list. It will not update its display unless the User Information list has been modified.
That’s all! Mwah mwah tsup tsup!
For my today’s task, I ran into an issue in sharepoint when my manager wanted me to modify the display name of one of our client account. Despite changing the display name information in the Active Directory, sharepoint was still showing the old display name in the ribbon toolbar and in the people picker when granting the user rights in the site.
Correct me if I am wrong, but I do think that there is no way to edit the information using the browser.
Because when you click on the user’s name, there you will see additional properties of the user. It delighted me because i thought that this is the fix seeing that there is an ‘Edit Item’ on top.
However, the edit dialog is just a
read-only display of the username. You cannot even edit any of the fields!
SOLUTION
Although some would suggest to do this via a Powershell script that would forcefully update the data, I have researched a way to do this via the browser.
Sharepoint maintains a User Information List that contains all the users that updated any item within the site or if the users have been granted access on the site. However this list is hidden and is located at http://<SiteCollectionUrl>/_catalogs/users/detail.aspx.
So if the display name was indeed modified on the Active Directory and if sharepoint can’t seem to update its display, then do the following steps:
1. Access the User Information List
2. Look for the User Account and click on the link
3. Delete the User on the User Information list.
4. Login the User Account.
On the next User login, the User information list is automatically updated with the new AD information.
Display name label seems to be sourcing its data into this list. It will not update its display unless the User Information list has been modified.
That’s all! Mwah mwah tsup tsup!
Tuesday, 16 July 2013
HOW TO CREATE A WORKFLOW USING SHAREPOINT DESIGNER. Send an email when an item has been modified and created on a list.
I. INTRODUCTION
My task for today is to create a workflow that sends an email every time a data has been added or modified in a list. I will accomplish this by using the Sharepoint designer to build the workflow.
I will also detail out in this post how to
compose an email body that will include a link that will redirect the user to
the modified/created list item.
II. SCOPE
This post would assume that there is already an existing custom list in place. It will not detail out how to create a site and custom list in sharepoint.
III. REQUIREMENTS
- Sharepoint 2010
- Sharepoint Designer 2010
II. SCOPE
This post would assume that there is already an existing custom list in place. It will not detail out how to create a site and custom list in sharepoint.
III. REQUIREMENTS
- Sharepoint 2010
- Sharepoint Designer 2010
IV. IMPLEMENTATION
1. Navigate to
http://<your site collection>/ in your browser.2. Go to your list and click on List Settings on the Ribbon tab.
3. On the top bar menu, Click on the Workflow Settings.
4. On the dropdown menu, Click ‘Select a Workflow in Sharepoint Designer’.
6. Type a name and description on the textbox and click OK.
7. Your designer view should look like the one below. Click on the Condition button on the toolbar and select ‘If any value equals value’.
7. Your designer view should look like the one below. Click on the Condition button on the toolbar and select ‘If any value equals value’.
8. A condition will be shown on the Step 1 box showing the ‘If value equals value’ condition. Click on the Value link and click on the ‘Define workflow lookup’ button.
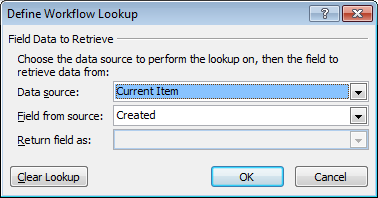
9. The ‘Define Workflow Lookup’ should show up. On the Data source field, select ‘Current Item’. On the field from Source field, select ‘Created’. Click OK.

10. Click on the other Value link and click on the ‘Define
workflow lookup’ button. On the Data source field, select ‘Current Item’. On
the Field from source field, select ‘Modified’. Click OK. Step 1 box should now
look like the one below.

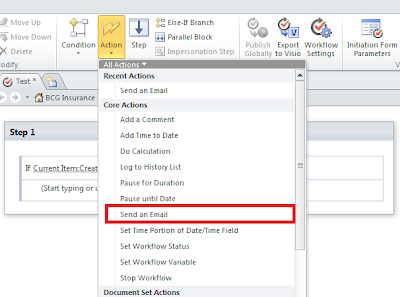
11. This condition will determine if the current item was created or recently modified. If the current item’s created field is equal to the current item’s modified field, it would mean that the item is a newly created one. Else, the current action has been modified. Send an email when the condition is true and would mean that a new item was created. Click on the blinking line and click on the Action button in the toolbar. Select ‘Send an email’.


11. This condition will determine if the current item was created or recently modified. If the current item’s created field is equal to the current item’s modified field, it would mean that the item is a newly created one. Else, the current action has been modified. Send an email when the condition is true and would mean that a new item was created. Click on the blinking line and click on the Action button in the toolbar. Select ‘Send an email’.

12. Click on the ‘these
users’ link and the Define E-mail Message window should show up.
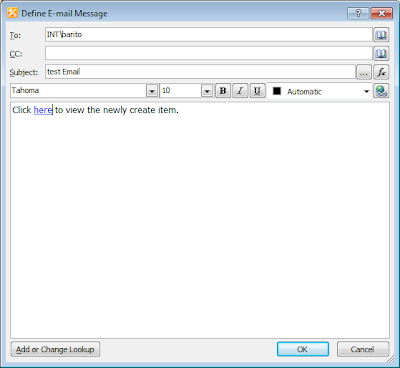
13. Type in the recipient of the email and its subject.
14. Create an email body that would include a link back to the recently modified/created item on the list. Click on the Body area and type in ‘Click here to view the newly created item.’
15. Create a hyperlink that would connect it to the newly created item. Highlight the word ‘here’ and click on the Edit hyperlink button.
16. On the Edit Hyperlink dialog, click on the address bar
and a string builder dialog box should show up. Type in the url of your custom
list and append the location of the displayifs page.
For Example: http://<Site Collection Url>/Lists/<List Name>/Item/displayifs.aspx?ID=
17. Click on the ‘Add or Change Lookup’ button on the String Builder window. On the Lookup for String dialog, Select ‘Current Item’ as a data source. And select ‘ID’ on the Field from source. Click on Ok. The link address should now look like the one below:
http://<Site Collection URL>/Lists/<List Name>/Item/displayifs.aspx?ID=[%CurrentItem:ID%].
18. The Define e-mail message should now look like the one below. Click on OK.

19. Add an else branch to the workflow to add an action if
the item has been modified.
20. Click on the blinking line and click on the Action button in the toolbar. Select ‘Send an email’.
21. Repeat Steps 12-18 to send an email whenever an item has been modified on the list.
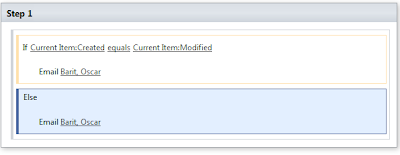
22. The workflow should now look something like the one below.

23. Make sure that the start options for this workflow has been setup correctly. Make sure that the ‘Start workflow automatically when an item is created’ and ‘Start workflow automatically when an item is modified’ are checked. This setting is available on the Start Options section found in the workflow settings page.

24. That’s it we are done. Try creating or modifying an item on the list and you should receive an email whenever you do these activities.
20. Click on the blinking line and click on the Action button in the toolbar. Select ‘Send an email’.
21. Repeat Steps 12-18 to send an email whenever an item has been modified on the list.
22. The workflow should now look something like the one below.

23. Make sure that the start options for this workflow has been setup correctly. Make sure that the ‘Start workflow automatically when an item is created’ and ‘Start workflow automatically when an item is modified’ are checked. This setting is available on the Start Options section found in the workflow settings page.

24. That’s it we are done. Try creating or modifying an item on the list and you should receive an email whenever you do these activities.
Subscribe to:
Comments (Atom)


_1342.jpg)